|
Photographing reptiles and amphibians can be a fun, challenging, and sometimes dangerous experience. But
in all, it can bring you to a whole new world of field herping.
In here I will discuss the basics of herp photography- There are a few basic things you will need to bring
along.
First and formost- a good camera.
With so many good cameras on the market, it can be tricky to find one within your budget that meets
your needs.
For good close-ups, get a digital with at least a 6x zoom ( optical- NOT digital),and with at least 3.2
megapixels for higher quality shots. I use a Minolta Dimage Z1 with great results .
Here a is picture of some of the other equipment that you will need to bring along.I will describe
them below from left to right......
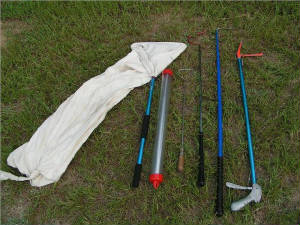
A good set of bags ( I started out with simple pillowcases). It's great to have different sizes handy for any reptile
that you want to relocate to a more suitable area for photographing. I have now graduated up to the Midwest Snake Bagger,
whitch helps keep a safer distance between myself and my subjects during capture and release.
The next pictured item is a tubing set to assist in the handling of my more aggressive subjects (again from Midwest).
A good hook and set of tongs come in handy for those really aggressive ones who have tendancy to have the "bite
first, ask questions later" demeanor. They also assist in your positioning the snake for photographing while keeping a safe
working distance between you and your subject. The hooks are also a smart choice for lifting tin,plywood,logs,and other
objects where potentially venomous species may live. My preferred choice is Midwest's professional field hook.
Other equipment not shown that is beneficial for your safety and acuracy in the field-
A good guidebook on reptiles and amphibians for making positive identifications of your subjects. (I use the National
Audubon Society Field Guide to North American Reptiles and Amphibians, and Venomous Snakes of the Southeast by Chad Mentor.)
In the field you will also need heavy boots and chaps or leggings for extra protection (they are also great for those
pesky briars!)
A tripod is handy to have for steady shots-it will help increase the quality of your images and give you a different
perspective of your subject.
With the right equipment, some good herping spots, and some creativity, you'll have the makings of a really
great field herping photography experience.
.
Basic Photo Techniques-
Here are some techniques that can help you with your photography.
ISO-
First thing is to choose an ISO setting which determines the image's clarity or graininess. Start off with a low
ISO, this creates a smooth image. Work your way up to the highest, which gives you a rougher product. For example, if you
are at a swamp on a overcast day and there's a frog or snake, a higher ISO will gather more light - causing a clearer capture
of the image.
Choosing a File Format-
Selecting the right format for your picture will determine how much data you record. This is called resolution. Resolution
is measured in pixels. There are different types of file formats- some that are uncompressed (such as TIFF), and
ones that are compressed (such as JPEG). JPEG is the most reliable and common format used. It produces some of the highest
quality shots out there and uses less space than TIFF.
Metering-
metering a background on your subject means the amount of incident light and light reflecting off your subject. On overcast
days, you will need a shutter speed of 1/15 per second and a F-Stop of F/4. On the other hand, on a bright sunny day, you
will need a shutter speed of 1/250- 1/400 per second and a F-Stop of F/16.
There are different settings on your camera for metering light such as spot metering, which you can use for
high contrast in very bright light or dark places.
F-Stop-
Your F-Stop is the aperture size of the lense on your camera. It controls the amount of light you will be using. The
smaller the F-Stop, the larger the aperture and the larger the F-Stop the smaller the aperture.
Depth of Field-
The depth of field- image area covering front to back perceived as being in sharp focus. This can be controlled by the
F-Stop. Using a small F-Stop such as F/16 produces a greater depth of field. Then by using a larger F-Stop, such as F/2, will
give you a smaller depth of field. Say for example, you are taking a photo of a rough green snake in the grass and want
both to comeout clear- use a smaller aperture, such as F/16. If you want to zoom in on the snake, use a larger aperture.
Shutter Speed-
Shutter speed controls the amount of time light is being recorded. A long shutter speed gives more light and a fast shutter
speed will give less light. If a frog jumps from the bank to the pond and your camera's shutter speed is set to 1/1000,
you will catch him in mid-air.
All this may seem a bit complex, but with practice and a little experimentation, you can acheive great results. So remember,
have fun with it! It's about having a good time and enjoying the wildlife around you.
|


